Friday, 25 October 2024

Gojju Avalakki

Gojju Avalakki

One fine summer evening, my lovely neighbor turned up with a box full of a dish that was a Kannadiga variation of poha. She is from Bengaluru and her Mom was visiting her. Auntie had cooked and sent this for us so thoughtfully. (Don't I love my neighbors!) I couldn't eat it the same day as I had already finished my dinner, so I carried it for lunch the next day. 

I still remember the moment when the deliciousness of flavors burst in my mouth and I shut my eyes to relish each bite better and tried to identify the flavors. It was so yummy and so very different from what I had ever tasted with poha. I have stayed in Bengaluru for around 7-8 years and forget tasting, I had never even heard of this dish. It's not served in Darshinis or restaurants. After a few bites I came to a pleasantly startling realization - it tasted like 'Bhutte ka Kis'- the famous dish with corn that Mom makes so well. But while the Kis takes some effort to cook, Gojju Avalakki is a breeze to make, said Auntie. It also required very few ingredients and did't involve any cutting or chopping. I was dying to have the recipe!

Serves 4

Ingredients:

Thick poha 200 gms (Suggested brand - Real)

Tamarind - (Swad brand) - small lemon sized

Sambar powder - a lot

Jaggery - 1.5 tablespoons

Salt - according to taste

For seasoning:

Oil - 2 tablespoons or even more

Asafoetida - a generous pinch 

Bydagi chillies - 2-3

Mustard seeds - A lot :)

Curry leaves - A lot 

Turmeric - 1 teaspoon

Sesame seeds - 1 tablespoon

Dry coconut powder - 2 tablespoons

Way To Go

1. Soak tamarind. 

2. Coarsely grind the poha. Wash it.

3. Strain tamarind. Mix tamarind pulp, jaggery, salt, sambar powder and water to it. Be careful with water. This paste should be on the thick side, not runny. Mix this paste with poha and taste at this stage. If any ingredients need to be adjusted, do so. Leave for a couple of hours or even overnight. The flavor will seep in better. The mix shouldn't be mushy. 

4. Heat oil. When sufficiently hot, add asafoetida, mustard (let it crackle), curry leaves (chop them if your family can't handle whole curry leaves). 

5. Dry roast the coconut powder and sesame seeds separately. 

6. Mix the tadka, coconut powder and sesame seeds with the poha mix prepared in step 3 and its ready to go!

Tips:

1. You can keep large batches of coarsely ground poha ready. Then just add the mix and the seasoning to make a quick meal.  

2. The paste can be kept ready too with dry tamarind (puliyogare style and with seasoning - no water). Just mix everything with warm water to have an instant meal. Auntie used to give it to kids for college days for a quick meal. 


Friday, 12 April 2024

Raw mango temporary pickle

I had this pickle at Vijita's place and it was drop-dead delicious! I was amazed at how a few and simple ingredients, when blended in the right manner, can create a burst of yumminess! This recipe is totally my kind of recipe. Minimalistic, very less prep time and high ROI! So, here we go-

Ingredients:

Raw mangoes - 2 mid-sized 
Dried red chillies (Bedige variety)12-13 (This is a variety of red chillies that give a hearty red color but are not that hot.You can easily find them in South India. I didn't have them so I used regular red chilies and then added kashmiri red chilli powder for the color)
Fenugreek seeds - 1 teaspoon 
Salt
Seasoning: Curry leaves, mustard seeds, chana daal, asafoetida (heeng), oil for sautéing and tadka.

Method:

1. Grate raw mangoes without peeling. Then pulse in the grinder for a second.
2. Sauté chillies and methi seeds together in 1 tsp oil for 1 minute. Grind them. 
3. Mix this and salt with grated raw mangoes. Put tadka and mix. 

Make sure that the raw mangoes are firm and not mushy. This pickle is best eaten fresh but can be kept in the fridge for 4-5 days.

Serving suggestions:

It can be served with anything, really. Here are a few ideas to pair it up with:
  • Parathas
  • Pongal 
  • Plain rice 
  • Pooran poli

Tuesday, 2 April 2024

Coriander Stalks Chutney

I love chutneys! They have the magical power to elevate a meal to another level. 

I generally use parts of coriander stalks along with the leaves to garnish veggies. At times, only the stalks are lurking behind. I don't feel like throwing them away. So I just add a few more ingredients and make a chutney, which I find so very yummy!

Ingredients:

1. Coriander stalks from 1 bunch coriander - the one we get at an indian grocery store here. 

2. 1 dry red chilly

3. 1/4 jalapeño or 1 green chilly

4.  2 cloves garlic

5. Salt

Method:

Coarse grind. Eat fresh. 

I didn't even add lemon or anything for sourness. It turned out to be totally lip smacking! 

Sunday, 25 February 2024

Kaadha aka Herbal Tea aka Magic Potion

Kaadha or Kasaay is a drink that has its origins in Ayurveda. This kaadha is like a manna from heaven during cold weather and has always given me immense relief during my cough and cold spells. I've also had it during covid as my immunity booster. It's delicious too and can easily replace your regular tea :)

Ingredients:

Water - Oh that eternal life giving nectar - 2 cups
Ginger - 2 inches, pounded
Coriander seeds - 2 teaspoons - pounded
Methi seeds - 1 teaspoon - pounded
Black pepper - 1/2 teaspoon powder  or 4-5 pepper corns 
Cloves - 1-2
Turmeric powder - 1/2 teaspoon
Cinnamon powder - 1/2 teaspoon (Sri Lankan cinnamon is considered the best.)
Gud (Jaggery) - Optional - 2 teaspoons or according to taste
Lemon Juice - 2 teaspoons

Method:

1. Put water on boil.
2. Add ginger to get the potion started. 
3. Keep adding the ingredients except cinnamon, jaggery and lemon. 
4. Add cinnamon midway. 
5. When everything else has been added, let it boil till the water reduces to half. Approx 15 mins. If you're low on patience, instead of half, 3/4th would be ok too. Something is better than nothing!
6. Then if you want, you can add jaggery or skip it if you're watching your sugar intake. 
7. Sieve the kaadha. When it reaches a temeperature where you can drink it, add lemon juice. Vitamin C is sensitive to heat and hence it should not be added to the boiling kaadha. 

Tips:

1. You can add or remove ingredients according to your taste and availability. For e.g. kaala namak or black salt is good against cough and can be added. Similarly, Mulethi (licorice) can be added too. 
2. I avoid adding honey instead of jaggery because honey should not be added to hot drinks. 
3. You can make a larger batch and keep in the refrigerator. Just add lemon juice as shared above. 
4. You can drink this occasionally as an immunity booster or as a welcome drink when youre hosting guests. 


Monday, 15 January 2024

Saag Reshmi


Saag 

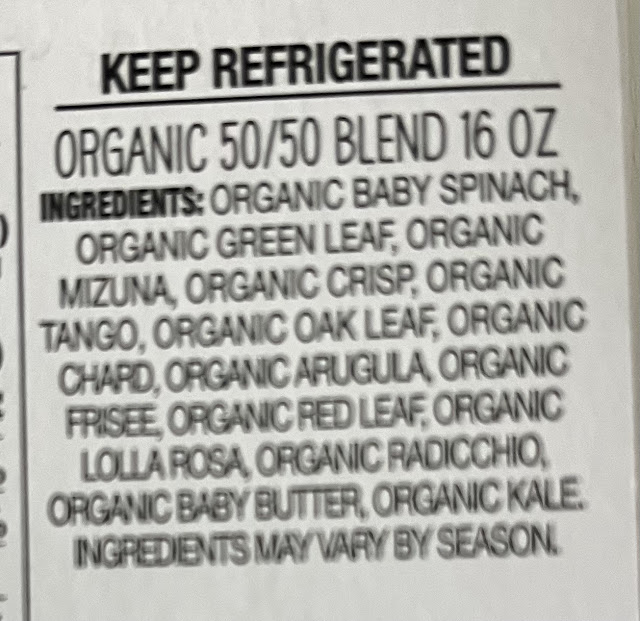
My Mom talked about a delicious sarson ka saag that her neigbor cooked for her. I had a 50-50 organic leaf mix sitting with me which I wanted to cook today. I instantly requested to speak to her for the recipe. The recipe is for sarson ka saag but I tweaked it for my lea and it turned out to be very delicious. I'll be posting both the original and the tweak. Thankyou for your recipe, Reshma!

Ingredients for Sarson ka Saag:

Mustard Greens - Sarson - 1 bunch

Spinach - 1 bunch

Bathua - 1 bunch

Garlic - 1 small pod or 10-12 cloves

Onion - 1 big or 2 medium

Tomatoes - 3-5(depending on the size)

Green chillies - 2-3

Ginger - 2 inches.

Ingredients for my Leaf Mix Saag:

Leaf Mix - 1 box - 450 gms (16 oz)

Radish leaves - tender - 6-7, without stalks

Radish - 3 inch piece - chopped

Onion - 1 big 

Tomatoes - 2 big

Green chillies - 2 

Garlic - 10 cloves - chopped in a manual chopper

Ginger - 2 inches - grated

Mustard oil - 3 teaspoons 

Ghee - a bit, for the final tadka

Red chillies

Salt, turmeric, red chilly powder

Method - 

1. Cover and boil the leaves and radish in very little water. Let the mix cool.

2. Chop onions and tomatoes. You can puree 3/4th of tomatoes and leave 1/4th  as roughly chopped. I used a manual chopper for garlic, onions and tomatoes. 

3. Heat mustard oil. You can use any other oil but mustard oil for mustard greens sounds just right!

4. Add garlic. Then onions. After a while,  add grated ginger and chopped green chillies. Add salt and let them turn golden brown. Add tomatoes. After 5 minutes, add turmeric and red chilly powder. 

5. I used the chopper to roughly grind the boiled leaves. Even if you use a mixer, do not make a fine paste. Add the coarsely ground leaves to the mix. Let it simmer for at least 10 minutes. The longer you simmer, the creamier the texture. If it's mustard greens, simmer for 45 minutes. This will help the curry to get a creamy texture. You can add garam masala. (I did not)

6. Prepare the final baghaar. Heat a teaspoon of ghee. Add 2-3 dried red chillies and add this mix to the saag. You can season this in butter or oil too. You can use more ghee or butter. It will definitely add to the taste but I did away with the additional fat.

7. I simmered it exactly for 45 minutes. The taste was perfect! Edit: I've made this by simmering for just 10 minutes and it tasted good. 

Tips:

1. There's no jeera or mustard seeds in the seasoning. Heeng can be added but I did not.

2. I could have added more radish leaves. I have a few kohlrabi. radish and beetroot leaves in my fridge. Wonder if I can try this recipe with that blend:) 

3. Do not add methi leaves to the mix. It will give a bitter taste. 

4. Try to boil the leaves in minimal water. 

5. I was curious about what all was in my leaf mix. Here it is! Very interesting :) 


Saturday, 12 March 2022

Teheri

Comfort food for a cold evening :) I just felt like eating a hearty teheri today and it turned out lip-smackingly satisfying!

Ingredients:

(Serves 3 Adults)

Basmati Rice - 1.25 cups

Ghee - 1.5 spoons

Potato - 1 medium - big chunks

Onion - 1 medium, cut thin lengthwise (skip them if you're short of time)

Garlic - 6-8 cloves

Ginger - 1 inch

Peas - 1/2 cup

Carrots - 1 big, julienned

Beans - chopped 1 inch pieces

Coriander leaves - chopped, a handful

Khada Garam Masala - 1 bayleaf (tej patta), 2 cloves, 1 open cardamom (elaichi), cinnamon powder.

Cumin seeds, chilli powder, turmeric powder, coriander powder, black pepper powder, salt.

Method:

1. Heat ghee. 

2. Add cumin seeds and then khada garam masala. 

3. Add pounded / grated garlic. 

4. Add onions and salt. Sauté for a while. 

5. Add ginger, potatoes, peas, beans, carrots. Sauté for 5 minutes. 

6. Add chili powder, turmeric powder, coriander powder, jeera powder. Mix well and sauté for another couple of minutes. 

7. Add soaked rice. Turn and mix. Add 1.5 cups water in 1 cup rice. One whistle in cooker. In IP - either rice setting or 5 minutes on manual. Let it cool. Add dhaniya patta. 

You'll love it! Eat with dahi, raita or a pickle of your choice. 

Wednesday, 6 May 2020

Bitter Fact About Bottle Gourd (Lauki) That Could Save your Life

Although bottle gourd is a very popular vegetable in Indian cuisine, there's a surprising fact about it, which people hardly know. A bitter bottle gourd could be fatal. 

Who would have thought that an innocuous-looking bottle gourd could make you rush to emergency?

A few years back, my sister-in-law had to rush to a doctor due to this. She had cooked a bottle gourd curry and it tasted bitter. Disregarding the bitter taste, she took another bite. Soon after, she started vomiting. The doctor told her that it was due to bottle gourd poisoning.

Recently, a friend again brought it to my attention. Her acquaintance landed in ICU due to this poisoning. Though my friend is an avid cook, she never knew about the probability of a bitter lauki wreaking such havoc. She insisted that I write a piece on this and finally, here it is!


A veggie full of goodness can turn fatal if bitter.


Also known as lauki, doodhi and ghiya,  bottle gourd has a mild, bland taste. But one in thousands can be bitter. 

The bitterness in bottle gourd is due to the presence of a toxin called Tetracyclic Triterpenoid CucurbitacinThis toxin could lead to stomach cramps, vomiting, diarrhea and gastrointestinal bleeding. 

Before using a bottle gourd:

1. Taste a small piece of bottle gourd from both ends.

2. If it tastes bitter, spit out the piece and throw away the gourd.

3. Drink bottle gourd juice in moderation. If consumed in leass quantity, around 50 ml, the poisoning can be managed better. If consumed over 200 ml, bitter juice can turn fatal. 

4. If you make juice out of bottle gourd, don't mix this juice with any other vegetable juice. Drink it neat!

For e.g. if bottle gourd juice is mixed with bitter gourd juice (lauki mixed with karela), the bitter gourd juice could mask the taste of bottle gourd in case the bottle gourd is bitter. Quite a tongue and mind twister, this! Read again :)

The same holds true for gourds, cucumbers, squash, pumpkin and melon family. If they taste bitter, don't use them. 

Symptoms:

In case a person complains of discomfort or starts vomiting blood after consuming a bottle gourd, don't take it lightly. 

The symptoms can be immediate or can take a while.

Rush to emergency and let the doctor know about the quantity and level of bitterness of bottle gourd consumed. Take a sample of bottle gourd/ juice with you if you can. 

This poisoning needs immediate medical attention. If left untreated, a person can lose his life. 

Treatment: 

There is no antidote for it. The patients are generally treated with intravenous fluids and a thorough checkup of all vital organs is carried out. 

Prevention is the Best Cure:

Spread the word amongst your family and friends. Speak to your cook.  

It is also important for emergency doctors to know about this poisoning and interventions required. 

By spreading awareness, you could save someone from an unpleasant, life-threatening experience.